

Quick jump to:
- Dragon’s Horns area – South Pillar (South Tower)
- Dragon’s Horns area – West Pillar (South Tower)
- Dragon’s Horns area – East Pillar (South Tower)
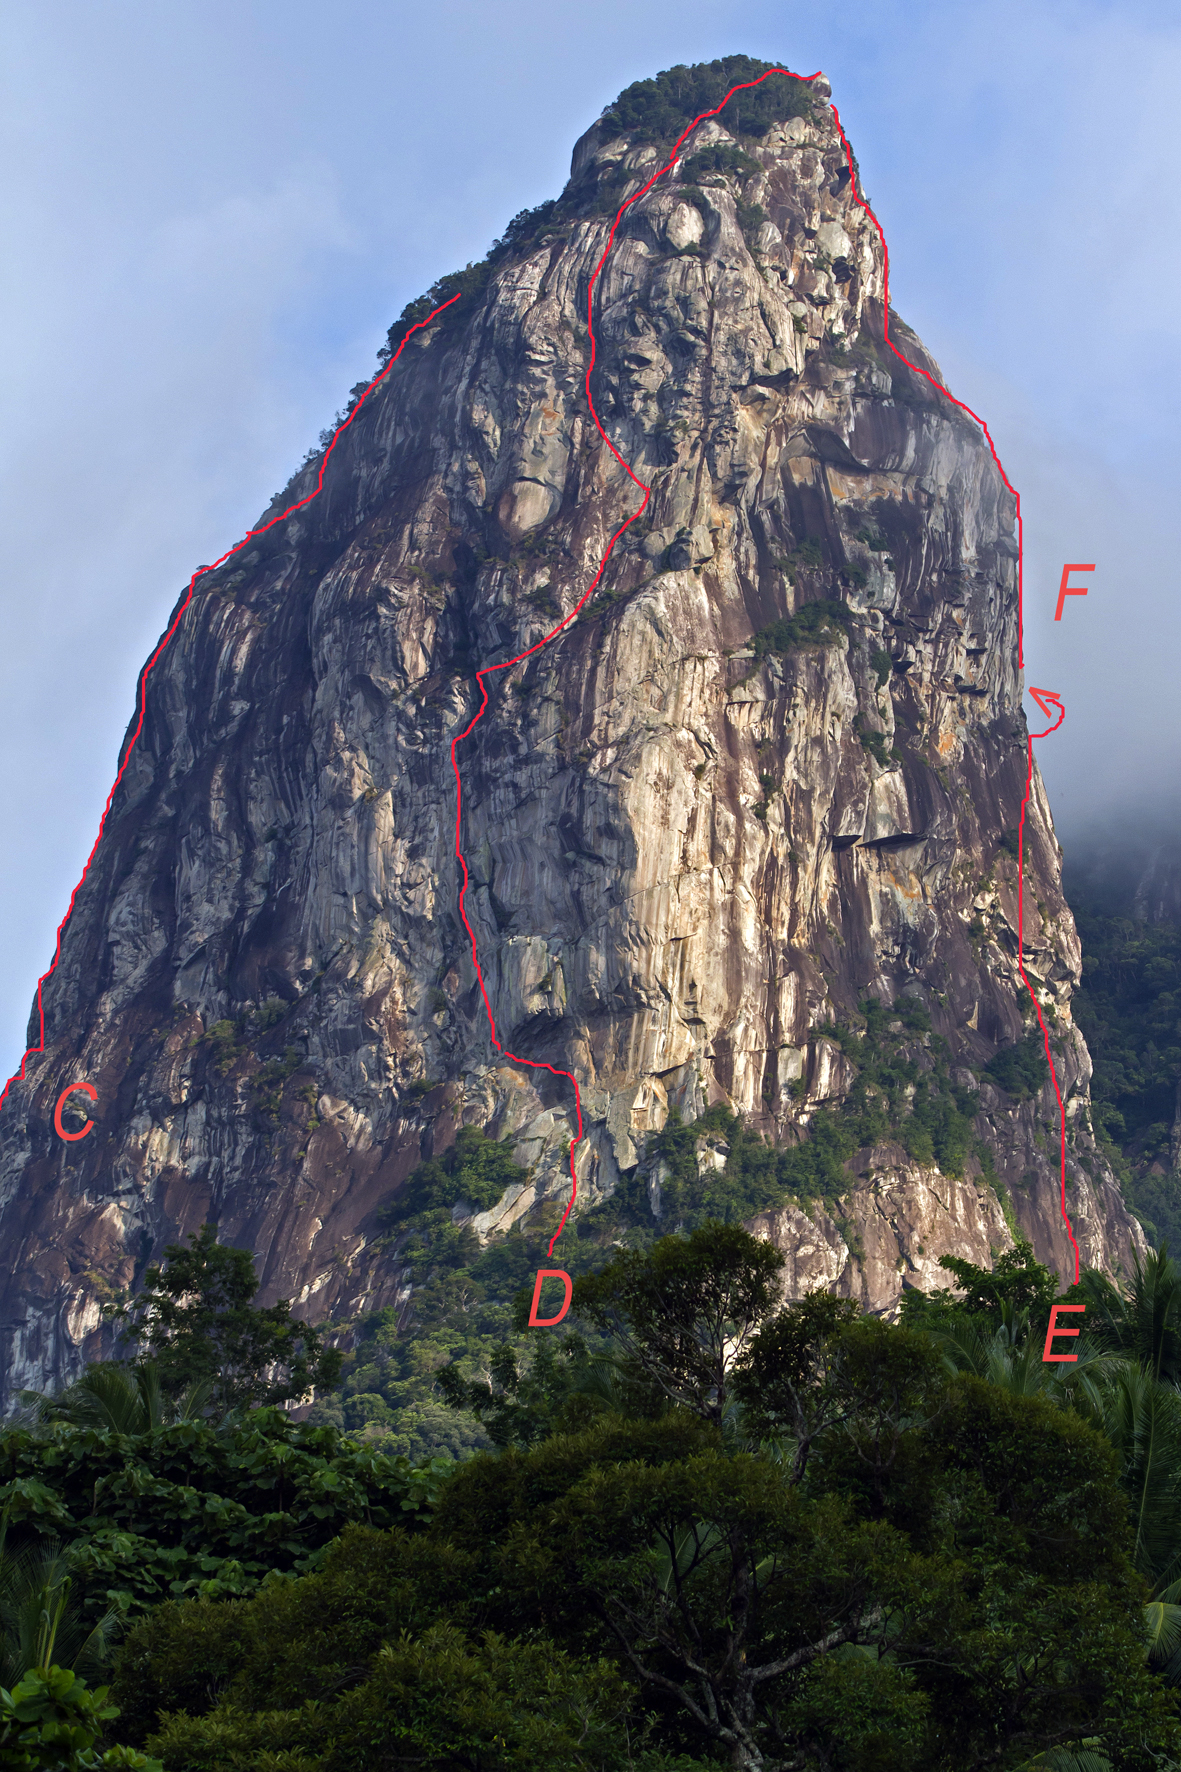
The Dragon’s Horns area: known routes on the West, South and East Pillar of the South Tower (Thanks to D.K. for the high def pictures)
The Dragon’s Horns – West Pillar – Known Routes

- A – Beckwith – Traver Route
V – 5.10 A3 – 400m – 2011
Matt Traver – Steve Beckwith
- B. Batu Naga (Stone Dragon)
IV – 5.12a – 300m – 2011
Cedar Wright – Lucho Rivera
- C – Damai Sentosa
6c+ or 6b+ / A1 – 280 m – Apr 2013
Arnaud Petit – Stephanie Bodet – Dan Liu Yong – Tam Khairudin – David Kaszlikowski
The Dragon’s Horns – South Pillar – Known Routes

- C – Damai Sentosa
6c+ or 6b+ / A1 – 280 m – Apr 2013
Arnaud Petit – Stephanie Bodet – Dan Liu Yong – Tam Khairudin – David Kaszlikowski
- D. Waking Dream
V- 5.13a / 5.9 A2 – 305m -2000
Scotty Nelson – Nick Tomlin
- I – The name of God – Ironin 3 (Iranian Three)
5.13 – 5.10 / A2 ??? – 485 m – Apr 2015
Mahmoud Ghavidel – Ali Rostami – Hossan Ateffi – Nima Parsa – Nassrolah Taheri
- E. Muka
7a+ – 360m – 2010
Martinek, Benes, Sobotka
- F. Polish Princess (share the start of Sam Sam)
7b+ – 270m – 2011
D.Kaszlikowski – E.Kubarska
- F. Sam Sam (end not visible here)
7b – 300m – 2010
D.Kaszlikowski – E.Kubarska
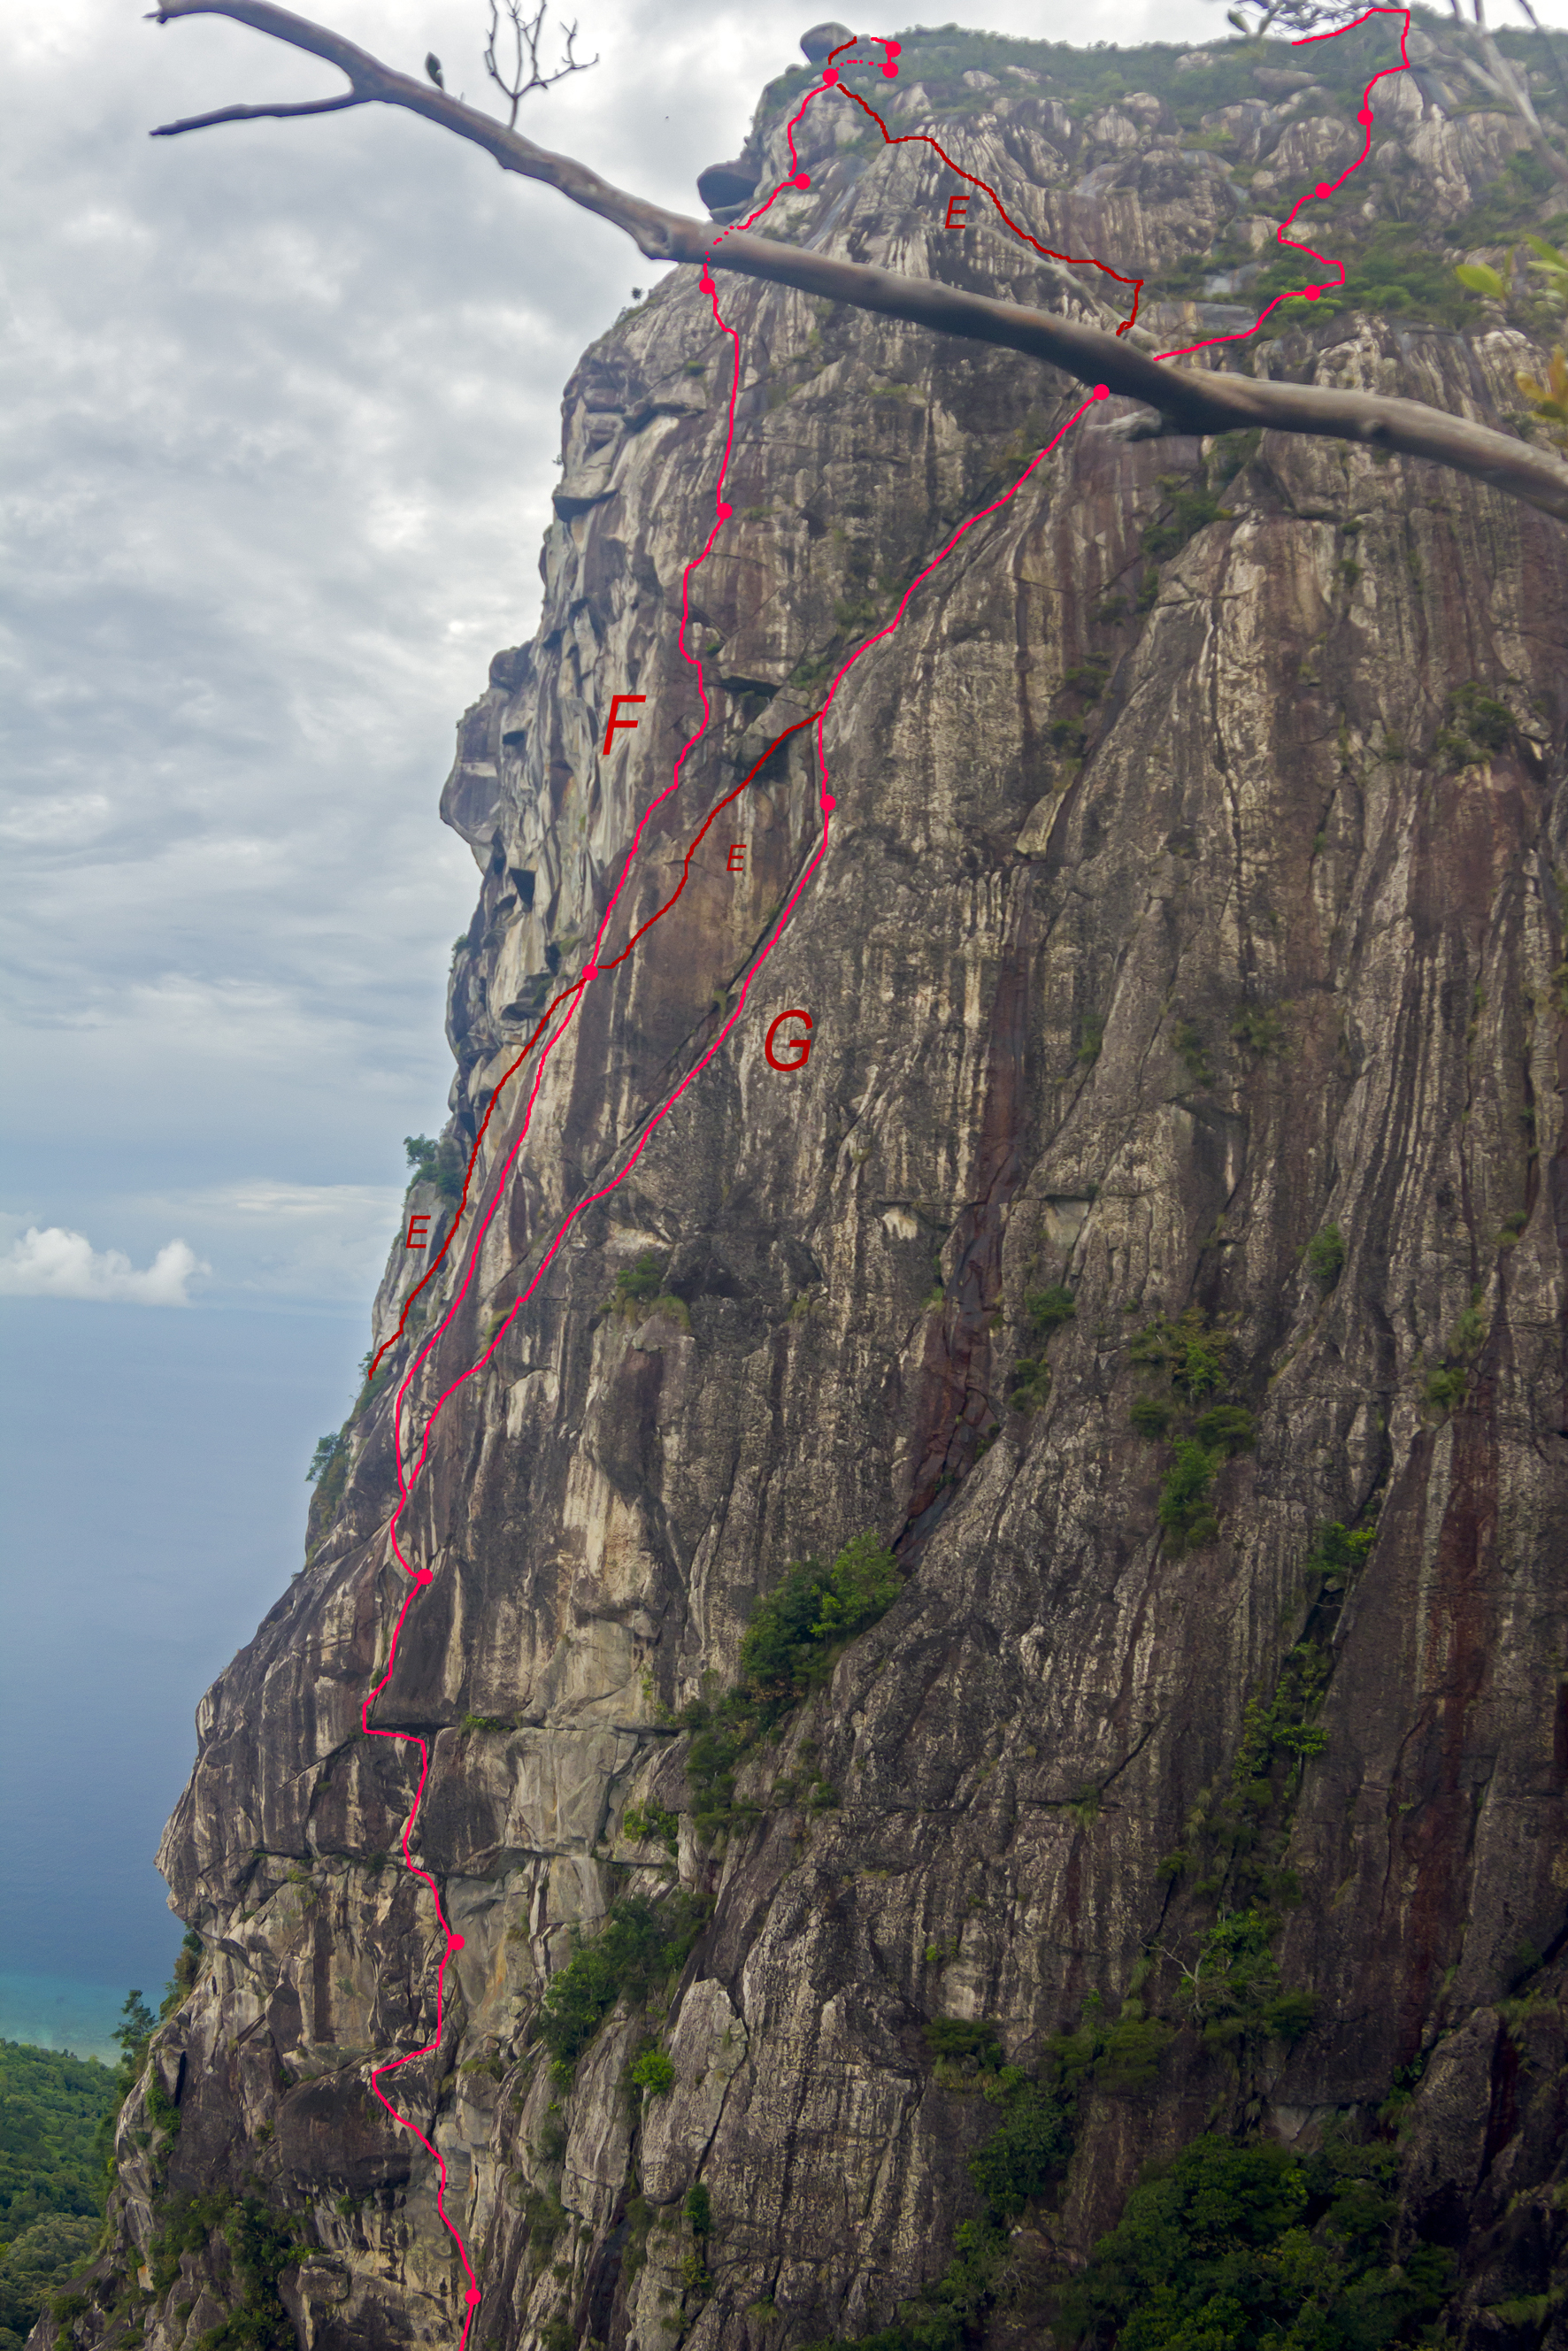
The Dragon’s Horns – East Pillar – Known Routes

- E. Muka
7a+ – 360m – 2010
Martinek, Benes, Sobotka
- F. Polish Princess
7b+ – 270m – 2011
D.Kaszlikowski – E.Kubarska
- G. Sam Sam
7b – 300m – 2010
D.Kaszlikowski – E.Kubarska
The Dragon’s Horns area: known routes on the South Pillar of the North Tower
The Dragon’s Horns – South Pillar (North Tower)- Known Routes

- H. Tanoshi Buttress (Happy Buttress)
5.10 (R/X) – 270 m – 2011
Cedar Wright – Lucho Rivera
The Dragon’s Horns – Route descriptions and topos
 for Daimai Sentosa - Dragon's Horns Tioman")

 for Tanoshi Buttress - The Dragon's Horns Tioman")
 for Batu Naga - The Dragon's Horns - Tioman")
 for the Beckwith Traver Route on the Dragon's Horns - Tioman")
 for Polish Princess - The Dragon's Horns Tioman")


These topos have been sourced from the respective first ascender’s website. We have grouped all the links on our resource page.
History of Waking Dream Grade V, 5.9, A2 (FA by Scotty Nelson/Nick Tomlin – Aug 2000).
Route Description

Here is an attempt at the route description from our perspective. The free grades are estimated and will need some confirmation. It follows Scotty and Nick’s original RD, but recommend splitting pitches 2 and 3 into two pitches each. Once you are on the line, it becomes obvious.
Walk-in: Follow the general directions as per our previous post. The highest point on the path is a little nek between the South horn and a boulder (boulder has awesome splitter cracks ). The climb starts here.
Pitch1 – F4 (35m). Vertical Jungleneering. Starts 6m left of the neck. Thrash up the vegetated gully for 20m, then briefly onto the smooth face. At the apex of the face enter the vertical forest, and head straight up to large tree below rock face next to belay terrace.
** warning ** many large rocks suspended in the vertical forest with roots and sand. Tread carefully to avoid sending these down onto belayers. Increased traffic likely to make these rocks less stable over time. It is also advised to set up a clean line onto the smooth face for hauling.
Pitch 2a – F6c? (25m) Straight to the wall. Turn the small overlap into a left-facing corner, then up right onto a ledge. Follow the cracks above the ledge up and slightly left to the “Kitten Walk” and belay below the big tree.
Gear: C4#4, Grey/yellow Hybrid Alien and black (or smaller) alien to protect a ground fall. Alternately, clip bolts to the left. Thereafter standard rack (purple, green, red C4 and large nuts).
Pitch 2b – F6b+? (15m) From “Kitten-Walk” follow obvious weakness – right first, then left – up to the “CatWalk”.
** warning ** flaky/crumbling rock entering the CatWalk – difficult gear.
Gear: Normal rack. Aliens into the CatWalk. Glue-Ins at anchor.
Pitch 3a – F6b? (22m) From right-hand end of CatWalk access the dominating crack (bold start) and follow it left under the Great Roof. Pendulum at the peg, then up to stance.
Gear: Normal rack. C4s #0.4 through to #2.
Pitch 3b – F6c+? (25m) Past the rivets into the beautiful finger-crack. Follow the crack up then left. Balancy moves left at the end of the crack to reach the Alcove.
Gear: Rivet hangers if desired. Green C4 after rivets. Thereafter normal rack and all your medium cams (C4 #0.3-#2). Glue-ins at anchor.
** warning ** first few moves of P4 have loose rock. Set up the anchor so that the belayer can move right, to avoid any falling rock.
Pitch 4 – F7c+R/5.13aR (30m). From right-hand end of the Alcove, access crack. Left into corner, then up to a half-foot ledge with two old bolts. Continue up thin seam above past rusty bolt to anchors on the left.
Gear: Normal rack to ledge. Thin gear (RPs!) above ledge. BlueTotemCam/OrangeMetolious3CU after old bolt. Glue-ins at anchor.
Note: vines in the corner after 4m. I cleared many of them … but would be great if you could clear the rest. Ladders and pruning scissors recommended.
** WARNING ** difficult gear through crux, with potential to fall onto the ledge. Pitch is traversing and steep, so lowering is difficult.
History: Second ascentionists took a nasty fall here
Pitch5 – F6c+? (25m) Just right and above the stance, follow the rivets and bolts to a crack. Right 5m at the ledge (ignore the bolt ladder) then up the vertical crack, onto ledge and easy R to anchors.
Gear: Rivet hangers if desired. Normal rack with C4s #0.3-#1, plus #4. Glue-ins at anchor. Ti bolts at 5m (protect fall onto belayer) and 12m (protect traverse).
Note: Steeply traversing and overhanging
History: After fall on P4, second ascentionists installed a bolt ladder to avoid the A2+ crux on P5.
Pitch6 – F6a? (40m). Up seeping crack to the left of anchors for a long way (30m?) until you see ledge with bonsai-looking shrubs. Follow ledge right past small, solid tree visible on the arete to the Garden Terrace just beyond the tree.
Gear: Normal rack, plus big gear (red,yellow,blue,purple hexcentrics … tubes if you have). Take 4m of tape to replace existing thread at 12m. Glue-ins at anchor.
Comment: Led this pitch at 10pm after a day of travelling and hauling. Distances and grades may be off.
Pitch7 – F7a? (35m). From Garden Terrace follow ledge right until it ends. Drop down and rail right 6m (crux). Then up past peg, left onto pillar, and follow cracks to anchor.
Gear: Normal rack. Cams through crux. Beautiful blue C4 #3 at anchor, with red and orange Metolious 4CUs above anchor. ( Maybe 2 x c4#3 – one on crux, one at anchor).
* Warning * Pillar sounded hollow to us …..
Note: Useful for communication if belayer can establish secondary anchor on expansion bolt at R of garden Terrace. (keep primary anchor on glue-ins!)
Pitch8 – F6b? (30m). Climb obvious line above anchor (wonderful!) into ledges then RHS left-leaning gulley. When RHS looks thin and unprotectable, step left across gulley to belay old bolts just left of a thin “cave”. (cams at the top of the cave).
Gear: Normal rack. Medium hexcentrics useful in gulley.
Comment: Pitch was dripping with condensation when we climbed it. Grades may be off.
Comment: Didn’t notice any Blocks of Death.
Pitch9 – F6bR (30m). Follow water runnels from anchor up and left into thin ground with Ti bolt. Turn runnel on R of bolt, and continue delicately to belay in the shade at tree and bolt.
Gear: Normal rack. Small cams with creative Alien placements. Save black and yellow aliens for after Ti bolt.
Pitch10 – F6a+R (35m) From anchor right and up (slabby!) to creative gear placements (Black Metolious PowerCam + big C4 #3 or #4), then traverse right slightly before heading up into vertical and unprotectable grasses before reaching gulley with trees.
Pitch11 – F3. Clamber carefully through trees, up at first then slightly right, to reach summit.
")
")

Descent:
- 35m. From your favourite tree(s) lower to anchors on P9.
- 30m. Down to new glue-ins just down and left of P8 anchors.
- 60m. Free down to Garden Terrace.
- 32m. Down to anchors on P5.
Then EITHER V or VI:
- 60m. Free down to the Alcove. Haven’t tried this, but looks feasible. Overhanging, so you’ll need to swing into the alcove. We think this can be done, but there’s a risk it’s too steep. Also, watch ropes in rope-eating crack 6m below anchors. We’d like to move the rap anchors left, to above the piton, or down to the side of the crack … but that’s a project for another time.
OR
- (a) Reverse P5. Re-directs required ** beware the rope-eating crack **(b) Reverse P4. Re-directs required.
Then
- 60m. From Alcove down to left end of CatWalk (45m) then up catwalk to anchors. Re-directs in finger-crack to avoid dropping into bushes.
- 40m. Down to ledge. Walk right to belay tree for P1.
- 35m. Down to ground. Be careful of dislodging any loose rocks.
Rack:
We went prepared for a Yosemite seige, and ended up with too much metal, spending more time in our ladders than we would have liked to.
A standard trad rack should be fine. Some recommendations:
- Double up on purple C4. We used this frequently.
- #4 C4 came in handy on many occasions.
- RP’s for P4
- Big hexes (or tubes) for P6
Waking Dream – First Ascent: Scotty Nelson and Nick Tomlin August 2000
This is their trip report as submitted to the American Alpine Journal
Tioman Island, Malaysia. In late August, 2000 Nick Tomlin and Scotty Nelson spent 8 days on Pulau Tioman, an island off the eastern coast of Malaysia, making the first ascent of the impressive Bukit Nekek Semekut, one of two peaks on the island’s southern tip known collectively as the “Dragon’s Horns”. Our route, Waking Dream (V 5.9 A2) climbs the prominent 400 meter south face of the jungle spire, and required 4 nights on the wall in portaledges. To the best of our knowledge this was the first ascent of the mountain.
The 10 pitch line required the drilling of 10 rivets and 8 bolts (for belays), in addition to the bolts already in place on pitches 1-4 from our previous attempts (1996 and 1998). The rock is of relatively good quality granite, and our line follows the most obvious weakness up the face. We placed a handful of pins; the route will go clean very easily.
We endured one particularly terrifying lightning storm on the third night; other than that we had excellent weather. Pitch 5 was the crux, where Nick Tomlin drilled 5 rivets to reach a thin crack, and then used aliens, hooks, micro nuts and a very sketchy tricam placement to lead us onto the lower angled upper portion of the wall (pitches 3-5 are vertical to slightly overhanging). Pitches 7-10 were climbed in a summit push on the last day, and involved mostly free climbing interspersed with some aid. Pitch 9 involved spectacular runnout 5.9 face climbing on funky dimples and scoops in a water groove. The top was spectacular, a perfectly flat bonzai garden with stupendous views of the ocean, the island’s interior, and the surrounding peaks. We stacked a cairn on the summit boulder and snapped some photos before rappelling to our portaledge on top of pitch 7 for the night, and then to the ground the next day.
This is probably one of the longest rock climbs in S.E. Asia, and one of the only big walls. The climb has a relatively easy approach, great exposure, and interesting climbing in an exotic locale (the views are great!). Care should be taken by prospective future ascentionists, though: the bolts we placed were not stainless steel, and are likely to rust quickly in the ocean air.
– Scotty Nelson
Other ressources related to this ascent can be found on Scotty’s geocities page, on the mountain project website and on the summitpost website


Waking Dream – First repetition: Malaysian team August 2002
Trip report from this second ascent can be found on Sharin Hashim’s blogspot.


Waking Dream – First Free Ascent: Dave Sharratt and Hank Jones in 2004
Freed Waking Dream grading it 5.13a / 7c+ / 29

Waking Dream – Other known ascents:
Cole Taylor and his girlfriend in November 2005
David Acott and Stephane Coupleux in September 2013
We climbed Waking Dream over 4 days (14th of September 2013 to the 17th of September 2013), topping out on Malaysia Day. To our best knowledge, this is the 7th ascent of the route. Overall, it took us three weekends to put the route back to its original state. Thanks Scotty & Nick for this visionary line. Trip Report on the next post !
-David and Stephane
Other climbing areas in Tioman: the Nipah and Juara sectors
Climbing the Dragon’s Horns is not for the average recreational climber or if you only have one day to spend on the island. To this effect, you can head to the following crags:
- Kampung Nipah (GPS Coordinates Long: 104.138244 Lat: 2.73336)
Nipah is a small village in the South of Tioman, between Genting and Mukut. As for Mukut, it is accessible by water Taxis from the Genting jetty. Getting to the routes will require another 5-10 min boat ride to access the beach where the jungle trail begins. From there, hiking on the hill will take 15 minutes before reaching the base of the climbs.
There are around 10 multipitch routes (2-3 pitches at max), ranging from F6a to F7a. The type of climbing is mostly slab and we don’t know much about the route conditions. Apparently, most of the bolts are older than 5 years old, so beware of the possible corrosion stress. You can also boulder on the beach, just before the trail leading to the crag.

More information and pictures are available on the Vertical Adventure website.
- Kampung Juara
Juara is a village on the East part of Tioman. The ferry from Mersing should make a stop there.
There are two sections in Juara:
1 – Karang Balau (GPS Coordinates Long:104.20697 Lat:2.79995)
The routes are located north of the village. Follow the road, cross a freshwater stream (careful during high tides) and spot the faint roped track that will lead you on a steep scramble to the crag (15min walk). The guys from the Juara Coconuts Cafe can guide you there for a small fee. There is apparently some 10-15 routes graded F5+ to F6c.
2 – Juara headland cliffs (GPS Coordinates Long:104.20697 Lat:2.79995)
As for Karang Balau, follow the road north, cross the freshwater stream and follow the coastline for about an hour. You should find a set of obvious overhanging rocks forming a cave. Down climb and scramble to reach the routes. Most of them are hard, above F7a and the bolts have been reported to be in an advanced state of corrosion. Be careful…
More information and photos available on the Vertical Adventure website
Stephane, small correction. At the first photo with route lines, you messed up Muka and Polish Princess/Sam Sam lines. Actually Muka line goes closer to your C/D (without top part) and E would be start for PP/SamSam – with aren’t visible on the photo. I kind of investigated line of Muka (which wasn’t clear for quite a long time) and now it goes as you can see at the photo from the link: https://www.dropbox.com/sh/nd8ft5290djt3pw/AADIXcr3tNzBu9PD_RA3S7xBa?dl=0
I think those shots will help, I’ll keep them for few days here..
Thanks David, I’m going to correct this and upload the new pictures.
Stephane